
This document applies to the inward site inspection, installation and inspection methods to be adopted for the underground drainage piping system. The work methods are summarized as follows:
Mandatory Equipment Required
- Measuring tape and setting out markers
- Electric drill hammer
- Hack saw cutter
- Pipe Fitters tool box
- Certified mobile scaffolds/step ladder
- uPVC pipes, fittings & accessories
Storage of Materials
Pipes shall be kept on a flat surface or on level ground free from stones and sharp objects.
The maximum stack should be 7 layers high as per normal condition and 6 layers high in hot condition.
Ideally a stack should contain pipes of the same diameter. If this is not possible nesting of the smaller pipes may be done.
The large diameter pipes should always be kept at the bottom of the stack.
All pipes stored in the stockyard to be covered with canvass to avoid direct exposure of pipes to sunlight/UV rays.
Preparatory Installation Requirements
Prior to installation of drainage and vent piping works, the supervisor and foreman will verify and ensure that all the safety requirements have been complied with and are in place.
The supervisor will verify that all relevant approved latest revisions of shop drawings, technical submittals, inspection and test plans are in the work place for installation reference. This also includes installation procedures.
Supervisor and foreman will inspect all the materials delivered to the work place and ensure that these are the required materials and also check for damage or defect.
Materials found not to be as per requirement or with damage or defect will be set aside. These will be properly labeled and returned to the warehouse.
These will also be reported in a Non-Conformance Report to the QA/QC Engineer.
Supervisor and foreman will orient and familiarize all the plumbers and labors involved in the installations regarding the relevant approved shop drawings, technical submittals, installation procedures and details, acceptance criteria and safety requirements.
The supervisor and foreman will examine surfaces to receive drainage and vent pipe works for compliance with installation tolerances and other required conditions, as described in the installation requirement. Installation will not proceed until unsatisfactory conditions have been corrected.
All installation I Construction I Testing works shall be carried out in compliance with the contract specification and project safety manual.
Installation of Underground Drainage Piping
Determine the position of the pipe as per approved shop drawing.
Drainage pipe invert level, less pipe thickness of 3mm to be marked out along the route of the pipe at intervals not exceeding 6 meters and at every branches, changes in direction together with positions of floor drains and drain points.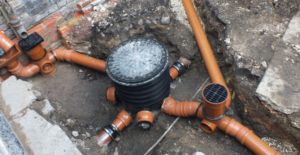
Positions of the floor drains, clean-outs, vents, and drain points to be clearly marked and identified by way of marker posts from main contractor’s surveyor reference provided on site.
Each drain run prior to installation will be marked out with string between points of changes in direction and held tight to prevent sagging.
This line will be on the crown of the pipe or if not possible to one side and will allow the pipe to be installed in a straight line to the correct slope.
For pipes extending from CB to CB, forms should be constructed and secured with provision of openings for pipes with the elevations indicated on the drawings.
The installation may proceed when the pipe routes have been set out.
Measure length of drainage pipe required and cut to suit ensuring a square cut. De-burr pipe and chamfer ends.
An allowance of 12mm for expansion to be made for each joint of pipe run.
Lay pipes in aligned with the marker strings.
Jointing of all fittings and straight Coupling
Measure depth of the socket and mark with pencil on spigot end of pipe.
Lubricate spigot end of pipe with the approved manufacturer’s lubricant.
Push spigot end of pipe into uPVC ring socket to full depth, ensuring that the ring seal is in place correctly and then pull back by a distance of 12mm to allow for expansion.
Repeat procedure along length of pipe and all branch drains.
At the head of each drain branch, ensure that the floor drain or drain point is level with the marker port reference and that the fitting is square.
On completion of each drain section, check and adjust if necessary to ensure that the pipe is in line with the marker string and all inverts are correct.
Pipe Casted in the Concrete
For pipe work that will be cast within the concrete slab, the pipe to be restrained and supported by bent rebar rods with tie wires fixed around the pipe to prevent movement during testing and pouring concrete.
During concrete pour, minimum one supervisor from Main Contractor & MEP Contractor to be present to supervise the work.
Proper care should be taken to avoid contact from the mechanical vibrator to the pipe to avoid pipe breakage.
In event of pipe damage during casting that particular section of pipe will be removed immediately and replaced and water will be filled to check for any leaks.
Casting will proceed to other areas till the pipe has been rectified.
Pipes shall be laid to uniform slope as per approved shop drawing & standards.
All of manhole entry and exit pipes to be provided with wall protection sleeves.
Pipe open ends to be covered with temporary fabricated end caps.
Inspection & Leak Testing Requirements
All works shall be inspected for quality workmanship and conformance to specification prior to offering for inspection.
Notice of inspection shall be advised to the consultant for their discretionary attendance and witnessing.
The inspection notice shall be advised at least 24 hours prior to date of inspection.
Water test is conducted to ensure and prove the tightness of the joints and ensure there are no leaks in the piping system.
The Water pressure test can be applied to the system in it’s entirety or in sections.
All openings in the piping will be tightly closed by end caps/plugs or by suitable means and the system filled with water to the point of overflow from the highest point.
At both the end of the pipe section to be tested the pipe will be upright vent.
The plugs will be opened temporarily to make sure that all air has been vented and that water has reached all parts of the system.
No section of the system shall be tested to less than 1.5 meter Head of water.
In testing successive section of the piping, at least the upper 3 meter of the next proceeding section will be tested.
Except the uppermost 3 meter, the whole system shall have been subjected to a height of not less than 1.5 meter Head of water.
The water shall be kept in the system or in the portion under test for at least 4 hours during inspection.
The water level will be marked on the pipe at the start and before the end of the test.
While the system is under test, a careful inspection shall be made on all the pipes and joints.
If any leaks in joints or evidence of defective fittings or pipe is revealed the defective fittings/ pipe shall be replaced with new.
After rectification the test will be carried out for minimum of 4 hrs.
Testing will be witnessed by consultant to their satisfaction and documentation will be maintained.
Only after approval of testing, the pipe would be allowed to cast within the raft slab.
Do not drain the pipes until the concrete is poured. The weight of water counter-weights the floating of the pipes.
Temporarily seal the pipe opening using plastic or wooden disc with packing tapes to avoid ingress of debris.
Checking the Slope of Drainage Pipe
Select the spirit level that will rest against the drainage pipe you are measuring without contacting fittings or other obstacles.
The level must rest only on the pipe. Invert level to be as per approved shop drawing.
Set the spirit level on the top of the pipe or hold it against the bottom. Note the position of the spirit level’s bubble, it should not be centered.
Lift the end of the spirit level until the bubble is centered.
Measure the distance between the end of the spirit level and the pipe.
The distance is the slope of the pipe along the length of the spirit level.
Standard slope for most soil and waste pipe is 1 percent downward in direction of flow.
Verify the slope is in the correct direction.
The pipe must slope downward from the source of the water or waste toward the main sewer or catch basin.