
This repairing method statement applies to all concrete repair of the following types.
Major Repair:
For all concrete repairs to be carried out as per manufacturer’s recommendations and shall be applied by trained personal as per consultant instructions.
For all major concrete repairs should be supervised by specialist personal.
For all major concrete repair works shall be check uniformity and bond strength via ITL tests at regular intervals as per client instruction.
Repair zones with congested reinforcement, reinstatement of large structural section, concrete affected by Alkali-Silica reaction and areas where excellent chloride and carbon dioxide resistance is required.
Minor Repair: All types of structural repair which can be applied by trowel or spray, structural members subjected to repetitive loading, reinforced or pre-stressed beams or columns.
Filling of Pinholes and Cracks: Filling Pinholes prior to over coating, repro filling over large areas up to 3mm depth and fairing coat.
Necessary Tools & Equipment’s
- Marker (Chalk or Pen).
- Disk Cutter.
- Electric / Pneumatic Breaker or Hammer and Chisel.
- Wire Brush.
- Measuring Jug.
- 1 KW Slow Speed Drill, 400 or 500 Rounds per Minute.
- 1 Bagger Concrete mixer.
- Hand Trowel.
- Wooden Float.
- Steel or Plastic Finishing Float.
- Finishing Sponge.
- Fosroc Renderoc LA (for large concrete repair)
- Fosroc Renderoc HS (for minor concrete repair)
- Fosroc Renderoc FC (for filling of pinholes and minor cracks)
Roles and Responsibilities for Concrete Repairing
The Project Manager is the responsible for the overall management of this project.
Construction Manager is responsible to provide all necessary services to facilitate work and to coordinate the work between the sub-contractors.
Project/ Site Engineer are responsible for the supervision and execution of this work. Project/ Site Engineer and the QA/QC Engineers are responsible for ensuring that the Concrete Repair is carried out according to the approved material manufacturer’s recommendation.
QA/QC Engineers are responsible for ensuring that all Concrete Repairs Works are carried out through the ITRs.
HSE Engineer is responsible for supervising the works to ensure full compliance with project HSE requirements and procedures. All safety precautions will be adopted according to the material safety data sheet strictly.
Concrete Repairing Procedures
It is suggested that, for temperature above 35°C, the following guidelines are adopted as good working practice.
Store unmixed materials in a cool {preferably temperature controlled) environment, avoiding exposure to direct sunlight.
Keep equipment cool, arranging shade protection if necessary. It is especially important to keep cool those surfaces of the equipment, which will come into direct contact with the material itself,
Try to avoid application during the hottest times of the day, arrange temporary shading as necessary,
Make sufficient material, plant and labor available to ensure that application is a continuous process.
Rectification procedure for defective concrete repair should be as below ( where as required )
Fosroc Renderoc LA (for large concrete repair)
Surface Preparation
Attention to full and proper preparation of the substrate is essential for complete repair adhesion.
Mark out affected area, then cut back edge of repair to a minimum depth of 10 mm.
Break out the repair area to remove all contaminated or damaged concrete to a minimum depth of 10mm, up to the pre-cut edge of the repair.
Fully expose any corroded reinforcement in the repair area and continue until un-corroded steel is reached. It may be necessary to break out the concrete beyond the original repair area in order to achieve this.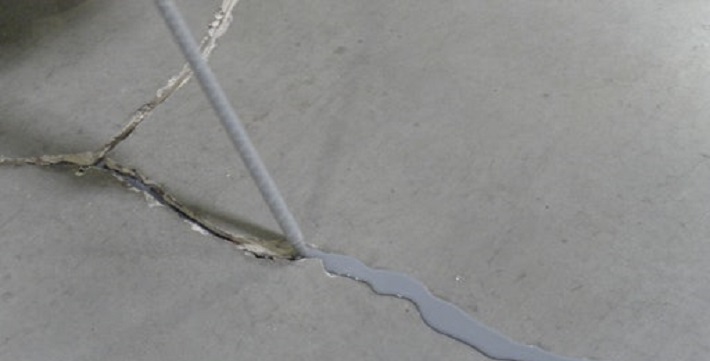
Oil and grease deposits are best removed by steam cleaning, detergent scrubbing or the use of a proprietary degreaser. The effectiveness of decontamination should be assessed by a pull-off test.
Fully clean the concrete and steel surfaces to remove laitance, the by-products of corrosion and other contaminants. This is most effectively achieved by proprietary blast media; with particular attention required to both the rear face of the bars and the edge of the repair. The steel bars should be cleaned to a uniform bright condition; and the edge of the repair should be ‘roughened’ to provide a good mechanical key at the substrate interface.
Chloride induced corrosion will further require high pressure washing with clean water after blasting to ensure complete removal of the corrosive elements.
Reinforcement Priming with Nitoprime Zincrich
Exposed steel reinforcement should be securely held in place to avoid movement during application, as this will affect the compaction and bond of the material.
Apply one full, unbroken coat of Nitoprime Zincrich and allow drying before continuing. If unsure about continuity of the coating, apply a second coat and allow drying.
Substrate soaking by water ( standard repairs )
Priming with water should take place after erection of the formwork.
Several hours prior to placing the Renderoc LA, the prepared concrete substrates should be saturated, by filling the formwork with clean water. Immediately prior to application of Renderoc LA, any excess water should be removed via the drainage outlet, leaving the substrate “saturated surface dry”.
Substrate Priming with Nitobond EP ( Bonding Agent Between Old & New Concrete )
This should be completed before erection of the formwork, and application of Nitoprime Zincrich.
Care should be taken to ensure that Nitobond EP is thoroughly mixed.
The ‘hardener” and ‘base’ components should be stirred separately before mixing to disperse any settlement.
The entire contents of the ‘hardener1 tin should then be poured into the ‘base’ tin and the two materials thoroughly mixed using a suitable slow-speed drill and mixing paddle for 2 minutes until a fully uniform color is obtained.
The sides of the tin should be scraped and mixing should continue for a further 2 minutes.
Nitobond EP should be applied as soon as the mixing process has been completed.
An unbroken coating of primer must be achieved – apply two coats. Each coat should be well’ scrubbed’ into the prepared substrate, the first coat being allowed to get before application of the second coat,
The primed substrate should then be left for one hour before proceeding with further application of the repair material.
Formwork
Formwork should be constructed such that the unrestrained surface area of the repair is minimized.
The formwork should be rigid and tight to the substrate to prevent grout loss. Use of silicone sealant, or similar, is also advised around the edge of the formwork.
The internal faces of the formwork should be sealed, using Reebol release agent, to ensure that water is not absorbed from the repair material by the formwork.
The formwork should include suitable drainage outlets for pre-soaking and, when filling the repair ‘bottom up’ (e.g. soffit repairs), should further include provision for air-venting to release trapped air as pouring proceeds.
There must be suitable access points to pour or pump the mixed material in place.
Mixing
It is essential that Renderoc LA is thoroughly mixed and that powder is always added to the water.
Measure out 3.38 liters per 25kg bag, of cool potable water, into the mixing apparatus. (It is Suggested that the temperature of the water should not exceed 20° C, so that the temperature Of the final mixed material is not greater than 30° C).
With the mixing apparatus in operation add one full bag of Renderoc LA and mix for 3 to 5 minutes until a smooth, even consistency is obtained.
Placing
Limits of the repair geometry should be in accordance with that laid down in the ‘Design criteria’ section of the current product data sheet.
The material should be placed within 30 minutes of mixing, in order to gain the full benefits of fluidity and expansion, which will fill all the repair voids.
Placement should be a continuous process, to avoid the formation of a ‘cold joint’.
If placing by pump, the pipeline should be ‘grouted’ with a rich cement slurry or mortar, discharging such grout as waste.
Pumping of the mixed material should follow immediately after grouting has been carried out.
Curing
Formwork should be left in place until the cured C 45 Concrete has reached a self-supporting, compressive strength, or as otherwise advised by the Engineer.
Immediately after the formwork has been struck, all exposed faces of the repair should be thoroughly soaked with clean water to remove residual traces of the shutter release agent. The repair should then be sprayed with render cure.
At ambient temperature above 30º C supplementary curing in the form of polythene sheeting, taped down at the edges, must be used.
Cleaning
Renderoc LA should be removed from tools, equipment and mixers with clean water immediately after use. Cured material can only be removed by mechanical means.
Nitoprime Zincrich and Nitobond EP can only be removed from tools and equipment using Fosroc Solvent 102.
Fosroc Renderoc HS (Minor Concrete Repair )
Surface Preparation:
Attention to full and proper preparation of the substrate is essential for complete repair adhesion.
Mark out the defective area, then saw cut the edge of the repair to a minimum depth of 10mm, angling the blade to create an undercut.
Break out the repair area to remove all contaminated or damaged concrete to a minimum depth of 10mm, up to the pre-cut perimeter of the repair.
Fully expose any corroded reinforcement in the repair area and continue until non-corroding steel is reached – it may be necessary to break out the concrete beyond the original repair area
In order to achieve this. Ensure that a clear gap of at least 20 mm is created behind the rear face of the steel reinforcement, such that a gloved hand can comfortably reach behind the bars.
Oil and grease deposits are best removed by steam cleaning, detergent scrubbing or the use of a proprietary degreaser. The effectiveness of decontamination should be assessed by a pull off test.
Fully clean the concrete and steel surfaces to remove laitance, the by-products of corrosion and other contaminants. This is most effectively achieved by the use of proprietary blast media; with particular attention required to both the rear of the bars and the edge of the repair. The steel bars should be cleaned to a uniform bright condition; and the saw cut edge of the repair should be ‘roughened1 to provide a good mechanical key at the substrate interface.
Chloride induced corrosion will further require high pressure washing with clean water, after blasting, to blasting, to ensure complete removal of the corrosive elements.
Reinforcement Priming with Nitoprime Zincrich
Exposed steel reinforcement, including any replacement reinforcement, should be securely held in place to avoid movement during application, as this will affect the compaction, build and bond of the mortar.
Apply one full, unbroken coat of Nitoprime Zincrich to the steel within 3 hours of cleaning, and allow drying before continuing. If unsure about continuity of the coating, apply a second coat and allow.
Substrate soaking by water: Thoroughly saturate the surface of the concrete with potable water to provide saturated surface dry condition. Poor quality concrete may require soaking for a significant length of time. Any surface water should be removed using an oil free compressed air-jet.
Mixing:
Only full bag mixing is permissible. Do not part mix, nor add further water to the mixed material in order to prolong workability. Either of these actions will result in an incorrect water-powder ratio, and will compromise final material performance.
It is essential that Renderoc HS is thoroughly mixed and that the temperature of the mixed material should not be allowed to exceed 20° C.
Water addition: 3.75 liters per 25kg bag.
Measure out the appropriate quantity of cool, potable water, into the mixing vessel (it is suggested that the temperature of the water should not exceed 20°C, so that the final temperature of mixed mortar is not greater than 30°C).
Always add the powder the water. With the mixer in operation add one full 25kg bag of Renderoc HS, or multiples thereof, and mix continuously for 5 minutes until fully homogenous, homogenous, using:
1). A1 KW, slow speed drill (400/500 rpm) + Fosroc MR4 mortar mixing paddle, for single bag mixing, or
2). A forced action, proprietary mixer for multiple bag mixing
Note: Free-fall mixers must not be used for mixing.
Application:
Apply mixed Renderoc HS to the substrate by trowel or gloved hand, thoroughly compacting onto the primed substrate. Ensure that the mortar is applied around the exposed steel reinforcement, compacting fully at the rear face.
Thickness of application should be in accordance with that laid down in the ‘Application Criteria’ section of the current product data sheet.
If sagging occurs on vertical or overhead faces, the Renderoc HS must be completely removed. The substrate must be re primed and Renderoc HS then reapplied in layers of reduced thickness.
Build-up:
Build-up of Renderoc HS is best-achieved using a ‘wet on wet’ technique.
Multiple layers can also be used to achieve the desired the thickness and profile; but can must be taken to ensure consistency of inter-coat bond strength,
Where multiple layers are to be applied, the surface of intermediate layers should be ‘scratch-keyed’ and cured with wet hessian. Further applications of fresh Renderoc HS may be applied once tie intermediate layer has reached its initial set.
Finishing:
Renderoc HS is finished by striking off with a straight edge and closing with a steel or plastic coat. Note that water can be drawn to the surface if ‘overworking’ with the float occurs, and unsightly finish may result
Damp sponges or plastic floats may be used to achieve a desired surface texture, but care should again be taken not to overwork the surface.
Curing:
Curing of repaired areas should be carried out as soon as possible after the surface has been ‘closed’. Water curing is the preferred method for Renderoc HS. Alternatively, Nitobond AR can be brush-applied to form a continuous film over the substrate. Increase the substrate requires overacting with epoxy coatings; Nitobond PE135 should be used for curing,
In adverse conditions (e.g. windy conditions or ambient temperatures greater than 30°C), use supplementary curing in the form of polythene sheeting, taped down at the edges should be used.
Cleaning: Nitobond AR, Nitocote PE135 and Renderoc HS should be removed from tools, equipment and mixers with clean water immediately after use. Cured material can only be removed by mechanical means.
Renderoc FC ( For filling Pinholes and Minor Cracks )
Surface Preparation:
Attention to full and proper preparation of the substrate is essential for complete repair adhesion.
The surface of the substrate should be thoroughly cleaned to remove all traces of dust, oil, paint, curing compounds, grease, corrosion deposits, algae or any unsound material which might affect subsequent bond between Renderoc FC and the substrate.
Oil and grease deposits are best removed by steam cleaning, detergent scrubbing or the use of proprietary degreaser. The effectiveness of decontamination should be assessed by a pull-off test.
The surface should further be ‘roughened’ to remove access laitance, to expose pinholes and blowholes and to provide a mechanical key for subsequent application of Renderoc FC. This is most effectively achieved by the use of proprietary blast media, such that the fine aggregate is exposed but not polished.
Where preparation techniques result in voids of greater than 3mm depth, it will be necessary to use other Renderoc products to make local repairs before coating with Renderoc FC. Such areas, once repaired, wilt not require additional preparation prior to the application of Renderoc FC.
Immediately prior to application of Renderoc FC, the prepared substrate should be blown dean with oil free compressed air.
Substrate Priming
All prepared areas should be thoroughly soaked with clean, potable water immediately prior to the application of Renderoc FC, such that the substrate is “saturated surface dry”.
Since Renderoc FC is only a surface skim coat, reinforcing steel should not be exposed and will not therefore need priming.
Mixing:
Care should be taken to ensure that Renderoc FC is thoroughly mixed. In all cases the powder should be added the water and mixed strictly in accordance with appropriate procedure.
Mixing – Small quantities:
Small quantities – up to 5 kg – may be mixed manually.
The mixing ratio, by volume, should be 3 parts Renderoc FC to 1 part water.
For the single volume water component select a conveniently sized measuring container and fill to the top. Add the measured volume of potable water to the mixing vessel.
For each of 3 volume of Renderoc FC, loose-fill the measuring container to excess with Renderoc FC, then strike off level the top of the measuring container.
Add the 3 volumes of the powder to the water and mix vigorously for at least 3 minutes, until homogenous.
Mixing – Large quantities
For larger volumes of material it will be necessary to mix using:
1) A proprietary forced action mixer, or
2) Slow speed drill (400/500 rpm) + Fosroc MR4 mortar paddle attachment.
For each bag of Renderoc FC to be mixed, measure out and place 2.8 to 3.0 liters of cool, potable water into the mixer (water quantity may vary slightly according to ambient temperature and desired consistency of mix).
Always add the powder to the water. With the mixer in operation add one full bag of Renderoc FC, or multiple thereof, and mix continuously for 5 minutes until fully homogenous.
Enhanced performance properties can be gained by adding up to 0.5 liters of Nitobond SBR (per full bag of Renderoc FC) in addition to the normal gauging water, until the desired consistency is achieved.
Application:
Do not proceed with the application when rainfall is imminent, unless in a sheltered or protected position.
Apply the fully mixed Renderoc FC to the prepared substrate, up to 3mm thickness, by steel trowel. It should be applied with the minimum of working, and be allowed to partly set before finally toweling to a smooth finish.
Thickness of application should be in accordance with that laid down in the ‘Application criteria’ section of the current product data sheet,
If a very smooth finish is required, a small amount of water may be flicked onto the surface of the Renderoc FC, with a paint brush, prior to final toweling.
Finishing:
Renderoc FC is finished by striking off with a straight edge and closing with a steel or plastic float. Note that water can be drawn to the surface if ‘overworking with the float occurs, and an unsightly finish may result
Damp sponges or plastic floats may be used to achieve a desired surface texture, but care should again be taken not to overwork the surface.
Curing: Curing of Renderoc FC is not generally required. However, under extreme drying conditions, high temperatures, drying winds – use Nitobond AR.
Cleaning: All equipment should be washed with clean water immediately after use. Cured material can only be removed by mechanical means.